Getting started with Evident
Overview
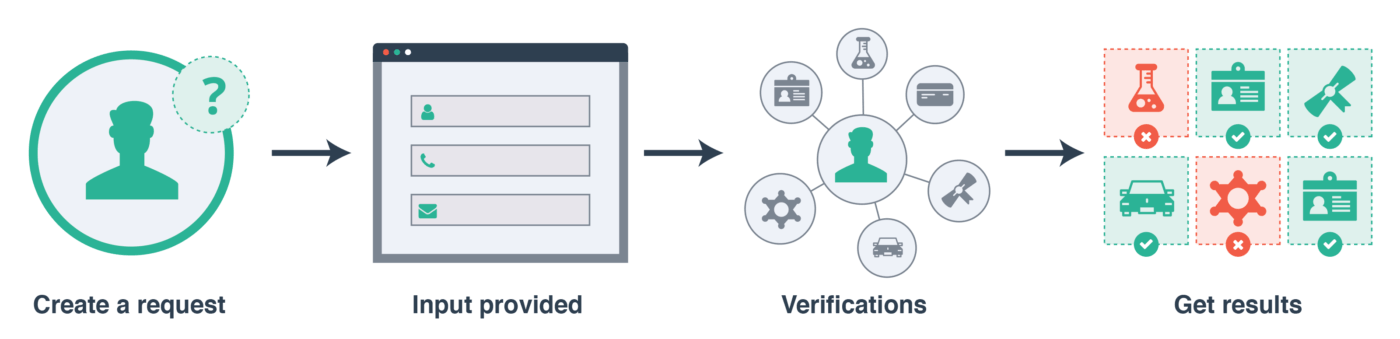
Finding the right verification solution means gaining the flexibility to address any challenges by efficiently gaining the answers needed to do business. Evident’s powerful platform allows businesses to confidently, easily integrate with plenty of room to scale and add capabilities with minimal effort.
The system always works in the same, simple way:
- You create a verification request using one or more attributes, such as if someone has a valid boating insurance or passes a background check.
- The end-user that owns the personal data you wish to verify submits their data to the platform.
- The system runs verifications to fulfill your request.
- The system reports an up-to-date result of the verifications, enabling your business operations.
How these steps play out depends on your chosen integration approach.
VerifyAPI and SubmitAPI
This integration mode offers complete customization of the platform end-to-end. In this integration your server gains visibility into personal data. Use this approach when your integration and envisioned experience can support all related security and regulatory responsibilities.
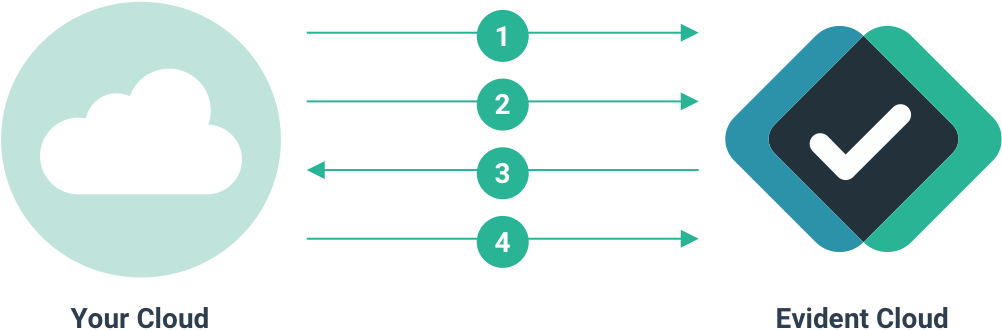
- Request created via VerifyAPI
- Submission of data via SubmitAPI
- Web hook notification
- Retrieve results from request via VerifyAPI
Create a request with VerifyAPI
VerifyAPI is a RESTful JSON API that allows you to create a request for verification, and retrieve information about an existing request.
You will need your username and an API key to authenticate yourself with VerifyAPI using HTTP Basic Auth. If you did not receive your credentials as you signed up, please send an email to support@evidentid.com. You should have one API key for production use, and another API key for sandbox use. We will show you how to use an API key with the corresponding VerifyAPI instance.
- The production VerifyAPI is located at
https://verify.api.evidentid.com/api/v1 - The sandbox VerifyAPI is located at
https://verify.api.demo.evidentid.com/api/v1
When presenting example calls like the one shown here, we will refer to your selected API as $VERIFY and your account name as $ACCOUNT.
Your API keys are secrets! You should call VerifyAPI endpoints from your server, and only your server. Be mindful of any leaks in how your key is used to ensure maximum protection.
For this integration, we create a request to verify information belonging to the end-user with the email jon.doe@somedomain.com. A verification request consists of attributes, which are small, verifiable data items used to build your own report of what you expect to be verified. The end-user will need to authenticate and submit personal data to the system for verification. Once the request is created, the end-user has 28 days from the time of their last submission to finish before the overall request times out.
| Field | Description |
|---|---|
email |
The email belonging to the user that owns the personal data you wish to verify. Depending on the integration mode, the user may be sent an email instructing them to answer a verification request. |
userId |
This is your own custom identifier that you may use to look up this end-user in the event you do not wish to use our identifiers. This allows better interoperability with your own database records. |
description |
A string that describes the intent of the verification request. This is used for your own records or communications with the end-user where applicable. |
userAuthenticationType |
This field controls how the end-user should authenticate with the system. For this integration mode, set this to blindtrust. |
attributesRequested |
An array of objects with key attributeType designating the data items you wish to verify. |
$ curl "$VERIFY/verify/requests" \
    -X POST \
    --header "Content-Type: application/json" \
    -u "$ACCOUNT" \
    -d @- << EOF
{
    "email": "jon.doe@somedomain.com",
    "userId": "jon.doe.12345",
    "description": "Please provide your ServSafe certificate number",
    "userAuthenticationType": "blindtrust",
    "attributesRequested": [
        {"attributeType": "certifications.servsafe.servsafe_food_handler.valid"}
    ]
}
EOF

Enter host password for user '$ACCOUNT': # Paste API key here to keep it out of history.
Here is the response from VerifyAPI indicating that a request was created. We’ll keep the id of the new request for reference later. The userIdentityToken is a multi-use token that you will need to authenticate against SubmitAPI. You can also keep the idOwnerId to reference the end user should you wish to see what verification requests apply to that user. We can use the request ID to both look up the status and results of the request at any time.
{
    "id":"3fc5ed0e-bb51-4c34-b294-0648969b7544",
    "idOwnerId":"ae954a66-8c00-4bc2-90f7-93c21542dab5",
    "userIdentityToken":"[lots of characters!]"
}
Submitting with SubmitAPI
Like VerifyAPI, SubmitAPI is a RESTful JSON service. You use SubmitAPI to send personal data up to the Evident platform. SubmitAPI powers the interactions for any experience in which someone represents an owner of personal data. In this integration mode, your server-side application is representing that owner.
- The production SubmitAPI is located at
https://submit.api.evidentid.com/api/v1/ - The sandbox SubmitAPI is located at
https://submit.api.demo.evidentid.com/api/v1/
We will designate your chosen instance in code with $SUBMIT. Since a client of SubmitAPI is representing an owner of personal data, that client will need to authenticate using the userIdentityToken provided by VerifyAPI as a bearer token ($TOKEN in the code).
VerifyAPI and SubmitAPI may appear symmetrical, but they differ on how to interpret data. VerifyAPI can be used to verify if someone passed a background check, but that would make SubmitAPI call for a social security number, date of birth and consent information for regulatory reasons. You will need to know what inputs are needed to verify associated attributes in VerifyAPI. The call shown here submits data used to verify the certifications.servsafe.servsafe_food_handler.valid attributes.
curl $SUBMIT/requests" \
    -X POST \
    --header "Content-Type: application/json" \
    --header "Authorization: Bearer $TOKEN" \
    -d @- << EOF
{
    "inputs": [
        {
            "type": "core.firstname",
            "value": "John"
        },
        {
            "type": "core.lastname",
            "value": "Smith"
        },
        {
            "type": "certifications.servsafe.servsafe_food_handler.certnumber",
            "value": "1234567"
        }
    ]
}
EOF
Webhook notifications
You can monitor progress for this integration using our webhook events. See Webhooks for setup instructions for your account.
{
    "eventType": "notificationFailure",
    "email": <the email address that could not be emailed>,
    "recipientType": <the type of user that could not be emailed>,
    "status": <the reason for delivery failure>
}
Check results with VerifyAPI
Let’s head back to the server. We will use the request id given to us by VerifyAPI from earlier to check on the report.
$ curl "$VERIFY/verify/requests/3fc5ed0e-bb51-4c34-b294-0648969b7544" \
    -X GET \
    -u "<account>"

Enter host password for user '<account>': # Paste API key here to keep it out of history.
The response may indicate that the results are not ready yet, in which case you can simply repeat the request in a minute or two. Eventually, the response will look something like this.
Here you see the attribute originally requested paired with a result. According to this, the attribute is flagged as “shared” due to the data submission.
The first value in the array located at values shows that the most recent submission of this set was fact-checked and deemed legitimate. A later verification might show false at the beginning to capture if the certificate was once valid, but is later invalid. What this means is that you can stay up to date on verifications. So if you issue this same request to the same person and get different results, you can respond accordingly.
If during onboarding you have opted into webhook and email notifications, then you will also be notified of these results automatically.
{
  "attributes": [
    {
        "status": "shared",
        "type": "certifications.servsafe.servsafe_food_handler.valid",
        "values": [
            true
        ]
    }
  ],
  "description": "Please provide your ServSafe certificate number",
  "id":"3fc5ed0e-bb51-4c34-b294-0648969b7544",
  "idOwnerId": "ae954a66-8c00-4bc2-90f7-93c21542dab5",
  "issuedAt": {
    "$objectType": "utctime",
    "timestamp": 1553528605
  },
  "summary": null
}
Attribute Statuses
When retrieving results from VerifyAPI, there are 4 states in which the attributes on the request can be: pending, shared, unavailable, and timeout.
pending: indicates that the attribute is still processing in the Evident platform.
{
    // ...
    "attributes": [
        {
            "status": "pending",
            "type": "certifications.servsafe.servsafe_food_handler.valid"
        }
    ]
}
timeout: indicates that the attribute has not been completed in the configured amount of time and will no longer calculate.
{
    // ...
    "attributes": [
        {
            "status": "timeout",
            "type": "certifications.servsafe.servsafe_food_handler.valid"
        }
    ]
}
Error handling
Both VerifyAPI and SubmitAPI may respond with a 4xx status code. In this case, the response will have a JSON body with a reason key containing a readable string explaining the error (e.g. { "reason": "Invalid parameters specified." }).
5xx status codes—which are far less frequent—are typically indicative of a temporary outage.
When making requests, inspect the body of the response for 4xx error codes, make relevant adjustments to your request and try again. If the error persists despite a previously successful integration or an apparent inconsistency in the documentation, please contact support.
{
    "eventType": "rpRequestCompleted",
    "rpRequestId": <the ID of the RP request that was completed>
}
Webhook notifications
You can monitor Evident platform events using webhooks. You provide to the platform some URLs that the Evident platform sends POST requests to at key moments along with a JSON payload. Should one of these POST requests fails, it will attempt to POST to the webhook as many times as you specify, with as much time as you’d like between each retry.
To set up a webhook, you will need the following things:
- The event to monitor
- Webhook URL
- Retry wait time on unsuccessful POST
- Number of times to retry
Send this information to our support team and your account will be configured accordingly.
Below you will find all supported events.
rpRequestCompleted
rpRequestCompleted fires when a verification finishes for an end user. The payload indicates the event type and the ID of the relevant request.{
"eventType": "rpRequestCompleted",
"rpRequestId": <the ID of the RP request that was completed>
}rpRequestSubmissionCompleted
rpRequestSubmissionCompleted fires when an end user submits their information. The payload indicates the event type and the ID of the relevant request.{
"eventType": "rpRequestSubmissionCompleted",
"rpRequestId": <the ID of the RP request that was completed>
}notificationFailure
The notificationFailure event occurs when the Evident platform failed to notify someone via email.
| Property | Description |
|---|---|
recipientType |
If id_owner, the recipient is an end-user that owns personal data. If relying_party, the recipient is an administrator on your account. |
email |
The relevant email address. |
status |
If bounced, the email was hard-bounced. If rejected, an email server refused to deliver the email to the recipient’s address. |
{
    "eventType": "notificationFailure",
    "email": <the email address that could not be emailed>,
    "recipientType": <the type of user that could not be emailed>,
    "status": <the reason for delivery failure>
}